What to Expect During a Norweco Singulair Green Installation
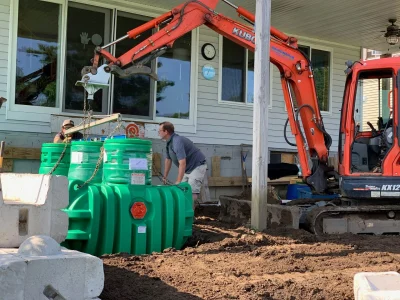

Installing a residential treatment system is one of those projects that most property owners only do once, and because of that, the process tends to feel more mysterious than it really is. People usually come into it with a few practical questions. How long will the work take? How much yard disruption should you expect? What happens with permits, inspections, and electrical work? And perhaps the biggest question of all, what exactly is being installed, and why does it have to be done a certain way?
If your contractor has recommended a norweco singulair green system, you are dealing with a treatment setup that is meant to do more than a conventional septic tank. It is designed to treat wastewater to a higher standard, which can make it a strong fit for properties with difficult soils, environmentally sensitive locations, limited drainfield options, or local code requirements that call for advanced treatment. That added performance also means installation tends to be a little more involved than a basic tank-and-field job.
The good news is that a well-managed installation is usually straightforward when the site has been properly evaluated and the contractor knows the system. The better the planning, the less drama there is on install day.
Why this installation is different from a basic septic job
A conventional septic system is simple in concept. Wastewater leaves the house, enters a buried septic tank, solids settle, and the partially clarified effluent moves on to a soil absorption area. The treatment relies heavily on the tank and the soil.
A Singulair Green system adds treatment equipment and process control. While exact layouts can vary by site and jurisdiction, the general idea is the same. Wastewater is treated in a more active, engineered way before it reaches final dispersal or reuse components. That means the installation is not just excavation and pipe placement. It often includes treatment units, electrical components, control equipment, air handling or aeration elements, pump chambers in some configurations, and sometimes more stringent inspection points.
For homeowners, that difference shows up in three main ways. First, the planning phase matters more. Second, the installation crew usually coordinates with more than one trade, especially electricians. Third, the final setup and startup are just as important as the hole in the ground.
A lot of anxiety around these systems comes from not knowing the sequence. Once you understand the order of operations, the project becomes much easier to follow.
The site visit sets the tone for everything that follows
Before any excavation starts, there is usually a site review. In a well-run project, this is not a quick walk around the yard with a tape measure. It is a technical visit that confirms the approved design still makes sense under real field conditions.
The contractor or designer will look at where the house sewer exits, where trucks and equipment can safely enter, how grading affects flow, where utilities are located, and whether there are any unexpected obstacles such as retaining walls, mature trees, irrigation lines, patios, or shallow bedrock. If the property has a well, a stream setback, or an especially tight lot line condition, those details tend to shape the install more than people expect.
I have seen projects where the approved plan looked perfect on paper, then ran into reality because a buried propane line was not marked or an old foundation corner showed up exactly where the treatment unit was supposed to sit. Good installers expect surprises and try to find them before machines arrive.
At this stage, you should also expect a conversation about access. A rubber-tracked excavator is gentler on a lawn than steel tracks, but even careful equipment leaves marks, especially if the soil is wet. If preserving landscaping matters, say so early. A contractor can often lay plywood in tight areas, adjust travel routes, or schedule around weather, but only if the issue is discussed before work begins.
Permits, approvals, and utility coordination
Most installations involving advanced treatment are permit-driven. Depending on local rules, there may be a septic permit, a building or plumbing permit, an electrical permit, and one or more required inspections. Some jurisdictions are very hands-on and inspect excavation depth, tank placement, piping, alarms, controls, and final grade. Others focus on key milestones.
This part of the project can feel slow because not much appears to be happening on site. Still, it is where many delays are avoided. A missed permit detail can stop a job cold. So can unmarked utilities.
Before digging, underground utilities should be located. Public locates usually cover the obvious services, but private lines often do not get marked unless someone specifically requests it. That includes things like landscape lighting, electric to a detached garage, water lines to barns, invisible dog fences, and private power feeds to gates or sheds. If your property has any of those, mention them.
Electrical planning deserves special attention with a norweco singulair green installation. Advanced treatment systems often need dedicated power for controls, aeration, pumps, or alarms. The electrician may need to run a circuit from the main service to a control panel or disconnect near the treatment components. On older homes, the service panel itself can become part of the conversation if there is limited breaker space or outdated equipment.
What happens on installation day
Once permits are in place and utilities are marked, the field work usually starts quickly. The first visible step is layout. The crew stakes or paints the approved location of tanks, piping runs, control panels, and any dispersal area. This is the moment to ask final questions about where lids will sit, how far the system is from driveways or planting beds, and what finished grade will look like.
Then excavation begins. The crew digs the tank and component holes to the required depth and footprint, and in most cases prepares a stable base using the material specified by the manufacturer or engineer. A rushed base causes long-term trouble. Tanks need proper support and level placement. If a hole is overdug and not corrected correctly, settlement can follow.
Once the excavation is ready, the treatment unit and associated components are set in place. On some sites this happens with an excavator. On others, especially with larger or awkward norweco singulair green components, a crane truck may be involved. Placement has to be precise because inlet and outlet elevations matter. A few inches too high or too low can create flow issues that are expensive to correct later.
After the major components are set, the crew installs the connecting piping. This includes the building sewer tie-in, transfer piping between treatment stages, venting or air components where required, and discharge piping to whatever final dispersal method the design calls for. If the system includes pumps, floats, or alarm circuits, those are installed and protected at this stage as well.
This is often the busiest part of the job visually. There may be open trenches, stacks of pipe, stone or bedding material, control boxes waiting for wiring, and several workers moving at once. To homeowners, it can look chaotic. To an experienced crew, it is just the normal overlap of excavation, plumbing, and equipment setup.
Expect a fair amount of yard disturbance, but not necessarily disaster
One of the most common fears is that the entire yard will be destroyed. That can happen on a poorly managed project, but it is not the default outcome.
The actual disturbed area depends on system size, equipment access, soil conditions, and how tight the site is. A simple replacement on a large open lot is usually manageable. A new installation on a wooded, sloped, or heavily landscaped property takes more finesse. Wet weather changes everything. Even small machines can rut soft ground badly if the crew has to make repeated trips over the same path.
The key thing to remember is that the visible disturbance often looks worse during the work than it does after rough grading. Open soil, spoil piles, and trench lines make a site feel more dramatic than it will a week later. Once the system is backfilled and graded, the footprint is easier to understand.
Still, there are practical trade-offs. Freshly graded ground may settle for a while. Seeded areas need time. If the installation happens in summer heat, lawn recovery can lag unless irrigation is managed well. If it happens in late fall, you may be looking at dormant seed until spring. Good contractors usually explain restoration limits clearly, especially if final landscaping is not part of their scope.
The system has to be installed to level and elevation, not just to location
This is the part homeowners rarely see, but it separates a proper installation from a merely passable one. A system like the norweco singulair green depends on correct elevations throughout the treatment train.
The incoming sewer line needs enough fall, but not too much. Tanks and chambers need to sit level. Transfer piping needs the intended pitch. Pump settings, float elevations, and alarm thresholds have to match the design assumptions. If the site includes a pressure distribution field or timed dosing, calibration becomes even more important.
A lid that looks tidy from the surface tells you nothing about whether the internals were set correctly. What matters is the hidden geometry.
I once walked a site where a replacement system had all the right parts from a distance, but the installer had cut a corner on pipe elevation to avoid an extra excavation step. The result was chronic flow imbalance and nuisance alarms. The fix required reopening work that had just been restored. That kind of problem is frustrating because it is preventable. It is also why inspection and startup matter so much.
Electrical hookup and controls are part of the real installation
Many owners think of electrical work as a side item. With advanced treatment, it is part of the system itself.
Expect some combination of conduit runs, control panel mounting, alarm installation, disconnects, and final wiring to motors or pumps. The control setup may be on an exterior wall, on a post, or integrated near the treatment unit depending on the layout and local code. Panels need to be accessible, protected, and mounted in a way that future service technicians can work on them without fighting brush, fences, or grade issues.
The alarm is there for a reason. It is not a decorative accessory or a nuisance feature that can be ignored. If the system uses aeration or pumping, the alarm tells you when something needs attention before a small issue becomes a wastewater backup or an untreated discharge problem.
A good installer will show you where the controls are, what normal operation sounds like, and what to do if an alarm goes off. Usually that means acknowledging the alarm, reducing water use if instructed, and calling for service rather than trying to experiment with the components.
Inspections can pause the schedule, and that is normal
At one or more points, the project may stop and wait for an inspector. Homeowners sometimes mistake that pause for a problem. Often it simply means the contractor is doing things in the correct order.
Inspectors may want to see the excavated base before tanks are set, open piping before backfill, or electrical work before final cover. On some jobs the service representative or manufacturer-approved technician is also involved in startup verification. That is especially common when a system has distinct operational requirements that must be documented.
Weather can stretch this phase. So can local backlogs. A job that takes one or two active days of field work may still span several calendar days because approvals happen in between steps. That lag is frustrating when your yard is open, but rushing through inspection points is worse.
Startup is not just flipping a switch
When the physical installation is complete, the system still is not truly done until it has been checked, energized if required, and put into operation properly.
Startup usually includes filling components as needed, checking for leaks, confirming that pumps or aerators run correctly, verifying float operation, testing alarms, and making sure wastewater is moving through the system as intended. If there is a timed or metered dosing component, settings may be adjusted to match the approved design and anticipated household flow.
This is also when small installation issues show themselves. A sticky float, a miswired alarm, a fitting that seeps under operating conditions, or an access riser that needs adjustment might not be obvious until the system is running. It is far better for those items to be found at startup than after the crew has left and the trench has settled.
The best startups are uneventful. That may sound underwhelming, but boring is exactly what you want from wastewater treatment equipment.
What you should ask before the crew leaves
There are a few practical points worth covering before the site is signed off. You do not need a technical seminar, but you do need enough information to live with the system confidently.
Ask where all access lids, cleanouts, and control panels are located. Ask what sounds are normal, if any. Ask how often service is required and who performs it. Ask whether there is a maintenance contract requirement under local rules. And ask what can safely be planted or built near the system area.
One short checklist can help keep that conversation focused:
- Where are the lids, risers, alarm, and control panel?
- What routine maintenance schedule should I expect?
- What should I do if the alarm activates?
- Are there restrictions on vehicles, structures, or trees over the system?
- When will final grading or restoration be complete?
Those answers matter because advanced treatment systems are not set-and-forget in the same way people imagine old septic tanks to be. They are reliable when maintained, but they do expect periodic attention.
Living with the system after installation
Once the site is restored and the grass starts coming back, most owners hardly think about the system day to day. That is as it should be. The basic habits that protect any septic-style system still apply here. Avoid hydraulic overload from marathon laundry days if your installer advises against it. Keep grease, wipes, harsh solvents, and non-flushables out of the plumbing. Direct roof water and surface runoff away from the treatment area. Do not drive heavy equipment over buried components unless the design specifically allows for traffic-rated installation.
What changes with a norweco singulair green setup is not so much daily lifestyle as awareness. You have treatment equipment working on your behalf. It deserves periodic service and observation. If local regulations require scheduled inspections, take them seriously. Catching a worn component early is cheaper than waiting for a failure signal.
One misconception worth clearing up is that more additives somehow mean better performance. In most cases, they do not. A properly designed treatment unit does not need mystery chemicals from a hardware store. When owners start pouring in products because they think they are helping, they sometimes upset the treatment process or damage downstream components. If you are tempted to use an additive, ask your service provider first.
Timing, cost variables, and the surprises that change both
People naturally want a neat answer on schedule and budget. Realistically, installation timing often falls into a range rather than a fixed number. A straightforward job might move from excavation to startup in a few days of active work, while a more constrained project can stretch longer because of weather, inspections, access issues, rock excavation, groundwater management, or electrical coordination.
Cost behaves the same way. The treatment unit itself is only part of the total. Site conditions often drive the biggest swings. Deep sewer exits, retaining walls, imported fill, dewatering, traffic control, utility conflicts, and elaborate restoration all norweco singulair green add complexity. A flat open yard with dry, stable soils is one thing. A narrow hillside lot with wet clay and limited access is something else entirely.
This is why the best estimates spell out assumptions. If a proposal is dramatically cheaper than the others, look carefully at what it excludes. Restoration, electrical, permit fees, and startup are common places where numbers get trimmed on paper and discovered later in change orders.
Signs of a contractor who knows the system well
Experience shows up in small details long before the installation is complete. An informed contractor talks comfortably about elevations, access risers, serviceability, power needs, and local inspection expectations. They do not wave away your concerns about lawn impact, but they also do not promise a zero-trace installation if that is unrealistic. They know where compromises can be made and where they absolutely cannot.
They also think ahead. They place lids where future maintenance will not require tearing out a fence. They mount controls where a technician can reach them in winter. They protect wires and piping from accidental damage during backfill. They keep records of final locations because nobody wants to probe around blindly for buried access a few years later.
That competence is especially valuable with systems that rely on proper startup and long-term service. A good installation is not just one that passes inspection today. It is one that remains understandable and maintainable years from now.
What a smooth project usually feels like
When a norweco singulair green installation goes well, it has a certain rhythm. There is a clear plan before digging starts. The crew arrives with the right equipment. Excavation and placement happen with purpose rather than guesswork. Electrical and controls are treated as integral, not optional. Inspections are anticipated. Startup is verified. The owner gets a plain-English handoff instead of a stack of paperwork and a shrug.
From the homeowner side, that usually translates to a few days of noise and disruption, a temporary patch of churned yard, and a lot of behind-the-scenes technical work that you may never fully see. Then the site settles down, the system disappears into normal life, and your attention shifts back to the rest of the property.
That is the right outcome. Wastewater treatment should be dependable, quiet, and largely invisible once installed. The value of doing the installation carefully is that you do not have to keep thinking about it later, except for the normal maintenance that protects your investment and keeps the system performing as designed.
Excavating New Jersey LLC
406 County Rd 565, Wantage, NJ 07461, United States
+1 973-791-4284
FAQ About norweco singulair green
How much does a NORWECO septic system cost?
The installed cost depends on the selected unit, engineering, site access, excavation, electrical work, disposal-field design and required approvals. A tank-only price is not a complete installation quote. Ask Excavating New Jersey LLC for a site-specific, itemized estimate that also explains ongoing service costs.
How does a Norweco septic system work?
The Singulair Green uses pretreatment, aeration, clarification and filtration to treat domestic wastewater. In the aeration chamber, oxygen supports bacteria that break down organic material. The Bio-Kinetic unit provides further filtration and flow equalization. Final effluent disposal must follow the property's approved design and applicable requirements.
What is the average lifespan of a septic system?
There is no guaranteed lifespan for every system. Design, installation, soil conditions, wastewater loading and regular maintenance all matter, and mechanical parts may need replacement before the tank. For a Singulair Green system, follow the manufacturer's service schedule and have a qualified provider assess its condition and pumping needs.